How to Make Your Print Go to the Bypass Feed on Hp Printer
Z7_3054ICK0KGTE30AQO5O3KA30N0
hp-concentra-wrapper-portlet
![]() Actions
Actions
HP Officejet Pro 8700 Printers - Extra Pages Feed Through the Printer
This document is for HP Officejet Pro 8710, 8715, 8720, 8725, and 8740 All-in-One printers.
The printer feeds more than one page at a time when you try to print, scan, fax, or copy.
note:The printer in the images might look different than your printer, but the steps are the same.
Step 1: Check the condition of the paper
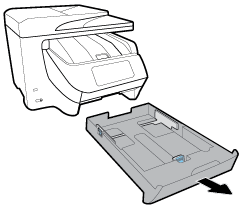
Remove the input tray, and then check the condition of the paper.
Plain paper
Check the condition of plain paper.
-
Pull out the input tray.
Figure : Pulling out the input tray
-
Remove any paper from the tray.
-
Inspect the paper tray and remove any obstructions such as torn paper, foam packaging materials, or tape packaging materials. Use a flashlight to view the mechanism inside the tray to make sure nothing blocks the paper from engaging with the rollers. Even small pieces of paper can cause paper feed issues.
-
Examine the condition of the paper, and then replace any ripped, dusty, curled, wrinkled, or bent paper.
-
Make sure all the paper in the stack is the same size and type. Never load mixed types of paper in the tray.
-
Tap the stack of paper on a flat surface to align the edges.
-
Make sure the stack of paper contains no fewer than 10 sheets and no more than 25 sheets of paper.
note:
You need to use these amounts of paper for these troubleshooting steps only. When the issue is resolved, you can resume loading paper according to the paper tray capacity specifications for your printer.
-
Slide the input tray back into the printer.
-
If your printer includes Tray 2 as an optional accessory, repeat these steps for Tray 2.
Try to print. If the issue persists, continue to the next step.
Envelopes, cards, and photo paper
Check the condition of photo paper, envelopes, and card stock.
note:You can print specialty paper only from Tray 1. Do not load specialty paper in tray 2.
-
Pull out the input tray.
Figure : Pulling out the input tray
-
Remove any paper from the tray.
-
Inspect the paper tray and remove any obstructions such as torn paper, foam packaging materials, or tape packaging materials. Use a flashlight to view the mechanism inside the tray to make sure nothing blocks the paper from engaging with the rollers. Even small pieces of paper can cause paper feed issues.
-
Examine the condition of the paper, and then replace any ripped, dusty, curled, wrinkled, or bent paper.
-
Make sure all the paper in the stack is the same size and type. Never load mixed types of paper in the tray. The printer can only process one type of paper at a time.
-
Tap the stack of paper on a flat surface to align the edges.
-
Make sure the paper is loaded correctly:
-
If you are loading photo paper or card stock, load the paper print side down and the short edge forward.
-
If you are loading envelopes, load the envelopes flap side up, with the flap pointing to the right.
Figure : How to load envelopes

-
-
Slide the input tray back into the printer.
Try to print. If the issue persists, continue to the next step.
Step 2: Clean the separation pad, plate, and paper pick roller
Dust, paper fiber, or other debris might accumulate on the separation pad, separation plate, or paper pick roller and cause paper feed issues. Clean the input tray separation pad, the separation plate, and the paper pick roller inside the printer, and then try to print again.
-
Gather the following materials:
-
Lint-free cotton swabs
-
Distilled, filtered, or bottled water (tap water might damage the printer)
-
-
Turn off the printer, and then disconnect the power cord and any other cables.
-
Pull out the input tray, and then remove any paper in it.
Figure : Pulling out the input tray
-
Inspect the separation pad. If dirt or debris is found, lightly dampen a clean, lint-free cotton swab with bottled or distilled water, squeeze any excess liquid from the swab, and then clean the pad.
Figure : Input tray separation pad

note:
Do not reinsert the input tray at this time.
-
Turn the printer so that the rear access door faces you.
-
Press the two tabs inward to open the rear access door.
Figure : Opening the rear access door

-
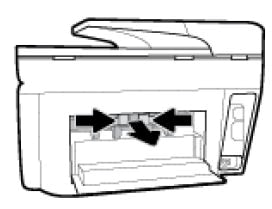
Press the two buttons on the paper path cover, and then pull the cover out of the printer.
Figure : Removing the paper path cover
-
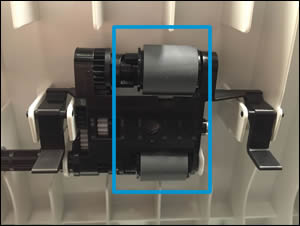
Locate the paper pick roller. The roller is behind the white separation plate shown in the following image.
Figure : Locate the paper pick roller

-
Lightly dampen a clean, lint-free cotton swab with bottled or distilled water, and then squeeze any excess liquid from the swab.
-
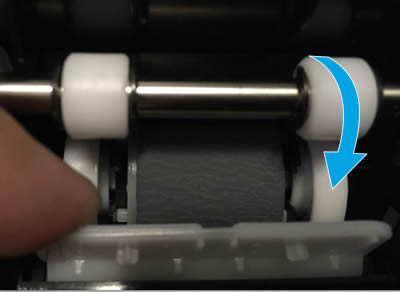
Pull the white separation plate outward as far as possible.
Figure : Pulling out the white separation plate
-
Use the damp swab to clean the inside of the separation plate.
-
Clean the paper pick roller with another damp swab, using your finger to push up and rotate the roller until you finish.
You might have to push up firmly at first to rotate the roller.
caution:
Pushing down to rotate the paper pick roller might result in damage to the printer.
-
Allow the separation plate and pick roller to dry completely (approximately 10 minutes).
-
Insert the paper path cover back into the printer.
-
Close the rear access door.
-
Turn the printer so that the control panel faces you.
-
Slide the input tray back into the printer.
-
Reconnect the power cord and any other cables to the rear of the printer, and then turn on the printer.
Try to print.
-
If multiple pages continue to feed into the printer at the same time, skip to the step to service the printer.
-
If the issue no longer occurs with the printer, but multiple pages feed through the ADF, continue to the next step.
-
If both the printer and the ADF pick paper one sheet at a time, you can stop troubleshooting.
Step 3: Clean the ADF rollers and separator pads
Dirt or debris on the ADF rollers or separator pad might transfer to the scanned item, causing streaks or lines.
-
Gather the following materials:
-
Several clean, lint-free cloths, or any cloth that does not come apart or leave fibers
-
Distilled, filtered, or bottled water (tap water might damage the printer)
-
-
Remove any documents from the ADF tray.
-
Turn off the printer, and then disconnect the power cord from the rear of the printer.
-
Lift the ADF cover.
Figure : Lifting the ADF cover

-
Locate the pick rollers and the separator pad.
-
Pick rollers
-
Separator pad
Figure : Locations of the pick rollers and the separator pad

-
-
Lightly dampen a clean lint-free cloth with distilled or bottled water, and then squeeze any excess liquid from the cloth.
-
Use the damp cloth to remove residue from the separator pad.
Figure : The separator pad

-
Use the damp cloth to remove residue from the pick rollers.
Figure : The pick rollers
-
Dry the pick rollers and the separator pad with a clean, dry, lint-free cloth.
-
Close the ADF cover.
Try to copy using the ADF. If the issue persists, continue to the next step.
Step 4: Service the printer
If none of the previous steps resolved the issue, service the printer.
Service or replace your HP product if the issue persists after completing all the preceding steps.
Go to Contact HP Customer Support to schedule a product repair or replacement. If you are in Asia Pacific, you will be directed to a local service center in your area.
To confirm your warranty status, go to HP Product Warranty Check. Repair fees might apply for out-of-warranty products.
craytonwitheing66.blogspot.com
Source: https://support.hp.com/us-en/document/c04995133
0 Response to "How to Make Your Print Go to the Bypass Feed on Hp Printer"
Post a Comment